AutomatR Studio Installation and Setup Guide
AutomatR Studio is a powerful tool for building and automating workflows. Installing it is a straightforward process that requires a few key steps. Here's a detailed guide on how to install and set up AutomatR Studio:
Before you begin, ensure that your system meets the minimum requirements specified by AutomatR. These may include operating system compatibility, memory, disk space, and other technical specifications. For more details, refer System Requirements section.
Visit the AutomatR Accounts portal.
If you don't have a AutomatR account, go to the registration page on the AutomatR website and follow the registration process. For more details, refer the AutomatR Accounts Registration section. If you already have an account, log in using your credentials.
After successfully logging in, you'll be directed to your account dashboard.
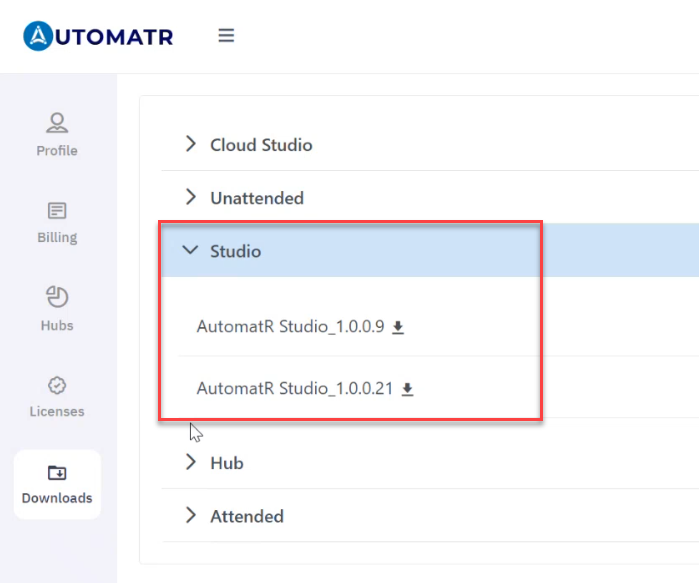
In the AutomatR Accounts portal, navigate to the Downloads tab. This tab provides access to download AutomatR products associated with your account.
In the Downloads tab, you will see a list of AutomatR products available for download.

Locate Studio from the list of available products and select the latest AutomatR Studio version. We highly recommend downloading the latest version to make the most out of the AutomatR application.
Click on the Setup file under the desired Studio section.
The download process will begin. Wait for the download to complete.
Once the setup file for AutomatR Studio is downloaded, locate the downloaded installer file (usually in your Downloads folder).
Double-click the downloaded setup file (usually in the format AutomatR Studio.exe) to initiate the installation process.
Follow the on-screen prompts to proceed through the installation wizard.
Choose installation options, such as installation path or destination folder where AutomatR Studio will be installed. You can use the default location or specify a custom one.
Review and accept the terms and conditions if prompted.
Click Install to begin the installation process.
The installer will now extract and install AutomatR Studio on your computer. This may take a few moments.
Once the installation is complete, click Finish to exit the installer.
AutomatR Studio is now installed on your computer.
You can launch it by locating the AutomatR Studio icon on your desktop or through the Start Menu.
Once you launch AutomatR Studio, you might be prompted to activate AutomatR Studio. Enter your registered Username and Password and click on Login to view the AutomatR Dashboard.
AutomatR Studio is now installed and ready for use. You can start creating and automating workflows to streamline your processes.
In case of any technical issues or questions, you can refer out to our support team at support@automatr.tech.
You've successfully installed and set up AutomatR Studio. You're now equipped to harness the power of AutomatR's automation capabilities. By following these simple installation and setup instructions, you'll be on your way to creating, testing, and deploying automation workflows that enhance operational efficiency and drive innovation in your organization.
AutomatR regularly releases updates and patches to improve the software. Make sure to keep your installation up to date by regularly checking for updates. If you're using a trial version, keep track of the trial period to ensure uninterrupted usage. You can switch to a licensed version by obtaining a valid license key.